Thursday, 11 April 2013
TechBoard Blogger Template Free Download ~ Blogger Templates
Template Name: TechBoard
Original Designer URL : http://fthemes.com/techboard-free-wordpress-theme
Template type:1 Sidebar, 2 Column, 3 Column footer, Featured Section, Fixed width, Fresh, Header Banner,Red, Right Sidebar, Slider, Tabbed widget, Top Navigation Bar,
Description: TechBoard is Magazine Premium template adapted from wordpress for blogger.This template is also SEO friendly.It have fixed social media button and fixed search box.You can put Ads in header.I am using this theme in this web Farhan kayani.I am customize this template using CSS and Html.If you Know Css then your easily customize TechBoard template.One thing more this template have slider.But I given you download file with both without slider and with slider.And that up to you which one you like without slider or with slider.Share this post with friends and make us happy.That's All
Don't Miss:How To Remove Powered By Blogger From Blog?Wednesday, 10 April 2013
How To Remove Blogger Navbar
 Blogspot is Best Platform for Blogging.We can easily Customize Blog Template using HTML and CSS. Blogger Team continuously work on Blog. officials make many changes.Now Today is Remove Navbar from blogger.Blogger has navigation bar for their default custom templates.This Bar appears at the top of every Blog.Some Time its looks not good even it shows that this is not a blog or websites In default templates.Many Peoples Want to Remove navbar from blogger.I have Solution For those Peoples who thinks to remove this.may be You will able for remove navbar for blogspot in 2013.This article is about how to remove blogger navbar in 2013 default template. Now Let me explain to remove or hidden. if you are using default blogger templates create by official.Then may be you Want to remove and make blog more beautiful.But in third Party Templates navbar is Hidden.Now I am Going to start.
How To Remove Blogger Navbar
You can Easily remove or hide.In 2013 you are Easily hide or show the bar in few seconds .Now I tell you to do it using two Methods.Methods are Given Below.
There are two ways to Remove Blogger Navbar.
In blogger old interface you will have to add some code in template to remove the navbar but now in new interface you have full right.
Method 1:Using CSS
Method 2:From Layout.
Method :1
Follow the following Steps.
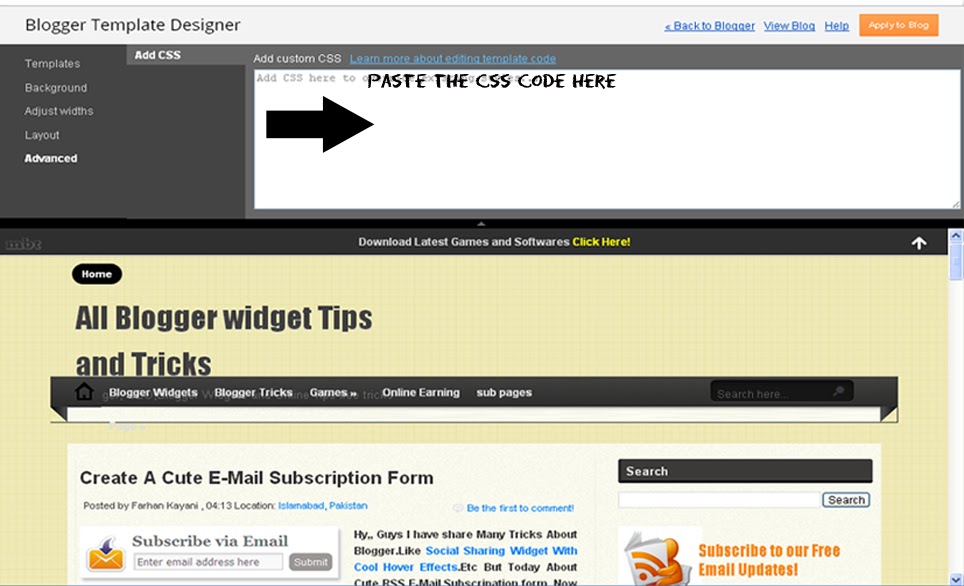
- Go To Blogger >>Template>>Customize.
- Click on Advance and Choose Add CSS.
- Paste the below code in white box.
- Now Finally Click on Apply Blog.
#navbar-iframe { display: none !important;}Method :2
- Go to blogger dashboard >> Layout:
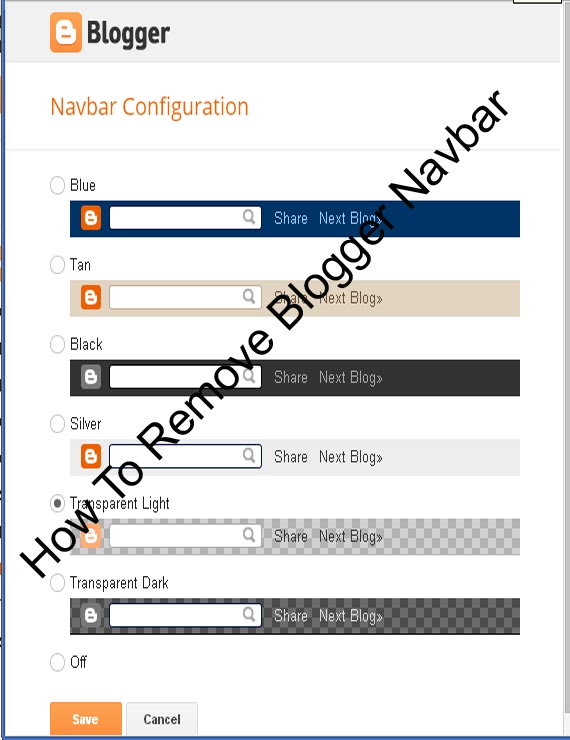
- Click on the Navbar Edit
- See the below image.
- Now you click on Edit you will see the below image.
- Finally Select off and save.Now see the blog.
Note:Use only one of above method to Remove Blogger Navbar.And that upto you which Method is easiest for you.That's All What you think about this post or any question feel free to ask.
Sunday, 7 April 2013
How to Add Wikipedia Search Box to Blogger ~ Widget 2013
Google officials ,continuously working on blogger platform to upgrade more gadgets.Now I am going to tell you about a widget recently created by blogger officials.Let me Explain Wikipedia is the free encyclopedia site which is use to find about history, scientific thing i mean to say Wikipedia is use for search topics with complete details for every Subject like Physics,Chemistry,biology,English and Urdu etc.Everyone Know Wikipedia is second Most Widely used Search Engine in the world.In this Tutorial i am tell you blogger officials recently created a new official Blogger Wikipedia Search Box widget .In the World Many Educational Blogs I Recommendation they having educational blogs, you must add this Widget in to Blog For Your blog readers because it helps to your Readers to find some thing unique inside your site.Now i am Going to tell you How to add Wikipedia Search Box to Blogger? You can easily add this Wikipedia Search Box to your blogger sidebar.
Don't Miss:New Facebook Pop Up Like Box For Blogger 2013
Don't Miss:How To Add Floating Facebook Like Box In Blogger?

Take 5 seconds and share this article with Friends and make us Happy.That's All
Don't Miss:New Facebook Pop Up Like Box For Blogger 2013
Don't Miss:How To Add Floating Facebook Like Box In Blogger?
How to Add Wikipedia Search Box to Blogger
- Go to Blogger dashboard >> Layout >> Add a Gadget >>
- Now Click on "More Gadgets"
- And find "Wikipedia " and click on the + and click Save.
- You Almost Done.
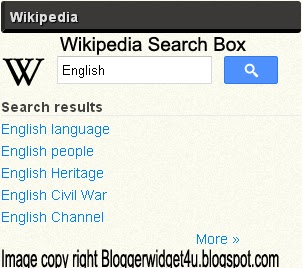
- See Below Screen Shot.
- Wikipedia Search Box to Blogger Live Demo in Below Picture.

Take 5 seconds and share this article with Friends and make us Happy.That's All
Friday, 5 April 2013
How to add marquee text for Blogger/blog?
Animation text is use to attract the visitor to tell your visitors what will be your next updates or if you repair a broken link and tell to visitor about broken link using marquee.Animation text (also called Marquee).Moving text which you can put or add anywhere in your blog and in posts.I'm going to explain you How to add marquee text for Blog.and we can customize Moving text in many ways.like change text direction,change text background and control marquee speed.I am Customize text with Using CSS.
Now I am going to show ,how to marquee text.if you want to move text. use the codes given below.
<marquee>ADD YOUR TEXT HERE.</marquee>
Example:2
<marquee direction="right">ADD YOUR TEXT HERE.</marquee>RESULT: you can change the direction of the marquee text adding 'direction' attribute.
<marquee direction="left">ADD YOUR TEXT HERE..</marquee>
Example:3
<marquee direction="right" width='90%'>ADD YOUR TEXT HERE....</marquee>RESULT:
You can change the moving width of marquee text.
Example:4
<marquee direction="right" width="100%" style="background:#FF6310"><font color="#000">ADD YOUR TEXT HERE....</font></marquee>RESULT:
<marquee direction="left" width="100%" style="background:#0080ff"><font color="#000">ADD YOUR TEXT HERE....</font></marquee>
Now I add text color,text background color for the text.You may replace #ff6310 and #0080ff with hexadecimal color number for background color of Marquee text and also replace #000 with hexadecimal color number for text color.
Example:5
<marquee direction="right" scrollamount="1">ADD YOUR TEXT HERE WITH CONTROL SPEED.</marquee>RESULT:
Now in this example I add scrollamount="1" to control marquee speed.if you want to customize the speed then change bold text in above code with your number.and also change text direction just replace right with left.
Example:6
<marquee direction="left"width="90%"><a href='http://bloggerwidget4u.blogspot.com/2013/04/how-to-create-move-text-in-blog.html'>How to add marquee text for Blogger</a></marquee>RESULT:
Now in this example move text with link. replace Red color url with your post address.and Replace bold words with your text.
That's All Take 5 second and share this article with friends.
Thursday, 28 March 2013
How To Add Subscribe Box to Blogger /website
How To Add Subscribe Box to Blogger? In this post i will tell to you how to increase your visitor to subscribe via RSS. Basically Rss services is let's your blog visitor like you blog posts and contents. and visitor want to read your posts through RSS news then they subscribe you via RSS.If Visitors Subscribe you then increase your blog pageviews. One thing is more in Subscribe Box with social media webs.(Digg,Twitter,Facebook,Stumbleupon,Delicious).Social networking is best to attract visitors to your website for read your contents and also How to Keep Visitors at Your Site Longer? Now Add this Email Subscription Form to your website in your blog sidebar and make your sidebar beautiful and more attractive.If you are Want to add this Widget then Follow the steps given below.
You May Like To Read:
- Create a Cute E-mail Subscription Form.
- How to add Animated Social Sharing Widget With Cool Hover Effects.
- Touch me sharing widget for blogs/blogger.
- How To Remove Powered By Blogger from blog?
- New Facebook Pop Up Like Box for Blogger 2013.
- Cool Email Subscription Widget With Social Media Buttons For Blogger.
How to Add Subscribe Box to Blogger /website.
- Go to Blogger Dashboard >> Layout >> Add a Gadget >> HTML/Javascript Box.
- Paste the following code in the HTML/Javascript Box.
- And click on Save.
<style type="text/css">
#subscribe-box {
overflow: hidden;
margin: 10px 0 0 0;
}
#subscribe-box a.subscribe-sec {
display: inline-block;
display: -moz-inline-stack;
width: 40px;
padding-top: 38px;
zoom: 1;
}
#subscribe-box a.subscribe-sec:hover {
color: #660000;
}
</style>
<form action="http://feedburner.google.com/fb/a/mailverify" style="border:1px solid #ccc;padding:3px;" target="popupwindow" method="post" onsubmit="window.open('http://feedburner.google.com/fb/a/mailverify?uri=FEEDBURNER-ID', 'popupwindow', 'scrollbars=yes,width=550,height=520');return true"><p>Get Notified When We Update !!!</p><p><input style="width:180px" name="email" type="text" value="Enter your email address:" onclick="this.value='';" /><input value="FEEDBURNER-ID" name="uri" type="hidden" /><input value="en_US" name="loc" type="hidden" /><input value="Subscribe" type="submit" /></p>
<p><div id="subscribe-box">
<a title="Delicious" href="http://delicious.com/DELICIOUS-USERNAME" class="subscribe-sec" style="background: url(https://blogger.googleusercontent.com/img/b/R29vZ2xl/AVvXsEjolF66RQ-anNZB9BKjQgJF7YClVCFw9fZbdhP5EjJYo3SIO9rvbWaH_EidWJ84jb3WH9fWHjGBOZ9JotZm_FmkE3j7CAZW9rB3jHK9tL9ge5LW9uJ35B0vh2b5vgqL406KiPvi046V2JOs/s1600/delicious.png) center top no-repeat"></a>
<a title="Twitter" href="http://twitter.com/TWITTER-USERNAME" class="subscribe-sec" style="background: url(https://blogger.googleusercontent.com/img/b/R29vZ2xl/AVvXsEjOiKv9By9IK9xQ4VNSbQ-BrIVRne-mdVKQ4a9N77tP0P2fRw_R65WbXdw5Vl5rYNUa1RJau5DNYiMrvua8CXGbxxLSB6-KuN9DjHxrqXWV5uXRDe70U6MnF5Ldp6yfmw3IWmKniZs7e0qO/s1600/twitter.png) center top no-repeat"></a>
<a title="Digg" href="http://digg.com/users/DIGG-USERNAME" class="subscribe-sec" style="background: url(https://blogger.googleusercontent.com/img/b/R29vZ2xl/AVvXsEgRdWPHqFqHoTV0dtLIeUKxDW8pOZS-485rE7Z9IZELeh5YBCbuujqHwlLDMm4J138GZYAV1Tct1r3EOqIJaj5o9I0qkcJDjqEQHXjn0O1GGiuf_VevO0_L1k6IqMlx1fIK8WXGEbTyCvBL/s1600/digg.png) center top no-repeat"></a>
<a title="Facebook" href="http://www.facebook.com/FACEBOOK-USERNAME" class="subscribe-sec" style="background: url(https://blogger.googleusercontent.com/img/b/R29vZ2xl/AVvXsEjbO5AKJnEw5OSo3XzKKTr3tqio2NZJViBAeiPlYD-0xCzfSVNfuzKkU8fhM_UO_3nuVfAqk1wInoXaWat6XogtgHgY31-lXNOwf6jWtssVi1nKGFem1Kt545M1zmPdtu6VkYFD7ozfVk4v/s1600/facebook.png) center top no-repeat"></a>
<a title="Stumbleupon" href="http://www.stumbleupon.com/stumbler/STUMBLEUPON-USERNAME" class="subscribe-sec" style="background: url(https://blogger.googleusercontent.com/img/b/R29vZ2xl/AVvXsEjiYuPK9N2zxS-Azcl4dxpFkfCxH5_-qx1L2fqY_q_yio-fq4bHmreCC7qxGoImk7upKCVJXovc2iBYijrGekN6ea-XOivH0mldmr9E0ThzIfXWDnjvs62TY-O5FQtQHUk0u1bvxABQFgiT/s1600/stumbleupon.png) center top no-repeat"></a>
<a title="RSS Feed" href="http://feeds.feedburner.com/FEEDBURNER-ID" class="subscribe-sec" style="background: url(https://blogger.googleusercontent.com/img/b/R29vZ2xl/AVvXsEgCGylydmmftFVNnUDT-R8BVZJTosX1aoeGqHHq3Ybec0u3hFgU0BKBzWQqqxez-hRZWddGud73sTFK2wvGd5-7AehaoqF7VW3DkyMYz0IxQbfEKVJjCawZzeAQfGtw3tJxiC4eBTqaKLuF/s1600/rss.png) center top no-repeat"></a>
</div></p>
</form>
Customization:
- Replace "FEEDBURNER-ID" with your feedburner ID.
- Replace "DELICIOUS-USERNAME" with your delicious username.
- Replace "TWITTER-USERNAME" with your twitter username.
- Replace "FACEBOOK-USERNAME" with your facebook username.
- Replace "STUMBLEUPON-USERNAME" with your stumbleupon username.
- Replace "DIGG-USERNAME" with your digg username.
- Get Notified When We Update !!! Change with your Text.
That's All.
Subscribe to:
Comments (Atom)


 I'm
I'm 


